ubuntu22.04离线安装jdk、mysql、redis、mongodb、nginx
-
- 1 jdk-8u181安装
-
- 1.1 安装包列表
- 1.2 安装方式
- 2 java依赖环境安装
-
- 2.1 安装包列表
- 2.2 安装方式
- 3 redis-6.0.19版本安装
-
- 3.1 安装包列表
- 3.2 安装方式
- 4 mongoDB-4.0.4安装
- 5 nginx-1.14.2安装
-
- 5.2 安装方式
- 6 Mysql-8.0.32 安装
-
- 6.1 安装包列表
- 6.2 安装方式
-
- 部署顺序
- 修改配置文件
- 初始化数据库
- 修改数据库密码
- 恢复密码验证
- 导入数据库
- 开通远程访问
- 7 ffmpeg
-
- 7.1 安装包列表
- 7.2 安装方式
ubuntu22.04离线安装jdk、mysql、redis、mongodb、nginx)
1 jdk-8u181安装
1.1 安装包列表
| 序号 | 名称 |
|---|---|
| 1 | jdk-8u181-linux-x64.tar.gz |
1.2 安装方式
1)	上传jdk-8u181-linux-x64.tar.gz安装包
2)	tar -zxvf jdk-8u181-linux-x64.tar.gz -C /usr/local
3)	cd ~
4)	vim  .bashrc
export JAVA_HOME=/usr/local/jdk1.8.0_181
export JRE_HOME=${JAVA_HOME}/jre
export CLASSPATH=.:${JAVA_HOME}/lib:${JRE_HOME}/lib
export PATH=${JAVA_HOME}/bin:$PATH
5)	source ./bashrc
6)	java -version #验证
2 java依赖环境安装
2.1 安装包列表
| 序号 | 名称 |
|---|---|
| 1 | net-tools_1.60+git20181103.0eebece-1ubuntu5_amd64.deb |
| 2 | unzip_6.0-20ubuntu1.1_amd64.deb |
| 3 | g++11.3.zip |
| 4 | gcc11.3.zip |
| 5 | make_4.3-4.1build1_amd64.deb |
2.2 安装方式
1)	传输上述五个文件到服务器内(任意文件夹)。
2)	dpkg -i net-tools_1.60+git20181103.0eebece-1ubuntu5_amd64.deb #安装ifconfig。
3)	dpkg -i unzip_6.0-20ubuntu1.1_amd64.deb   #安装unzip解压软件。
4)	cd g++11.3/   #进入g++11.3文件夹。
5)	dpkg -i *deb   #执行安装该文件夹内所有后缀为deb文件。
6)	cd ../gcc11.3   #退到上一级目录并进入gcc11.3文件夹
7)	dpkg -i *deb   #执行安装该文件夹内所有后缀为deb文件。
8)	cd ..           #退到上一级目录。
9)	dpkg -i make_4.3-4.1build1_amd64.deb #安装make环境。
10)	g++ -v        #查看g++版本。
11)	gcc -v         #查看gcc版本。
3 redis-6.0.19版本安装
3.1 安装包列表
| 序号 | 名称 |
|---|---|
| 1 | redis-6.0.19.tar.gz |
| 2 | redis.conf |
3.2 安装方式
1)	上传安装包到任意目录下
2)	mkdir -p /usr/local/redis           # 创建redis文件夹。
3)	tar -zxvf redis-6.0.19.tar.gz -C /usr/local/redis  # 将压缩包解压到上一步骤创建的redis文件夹内。
4)	cd /usr/local/redis/redis-6.0.19     # 进入到解压的文件夹内。
5)	make                           # 执行编译。
6)	make install PREFIX=/usr/local/redis # redis安装到指定目录。
7)	mkdir -p /usr/local/redis/conf      # 创建配置文件存放目录。
8)	cp /usr/local/redis/redis-6.0.19/redis.conf  /usr/local/redis/conf # 将配置文件放置到创建好的目录内,或者直接列表内的redis.conf文件直接拷贝过去,就不要执行下面修改配置文件的操作。
9)	vim /usr/local/redis/conf/redis.conf  #修改配置文件。
在GENERAL下增加或修改成daemonize yes #设置后台运行,如下图
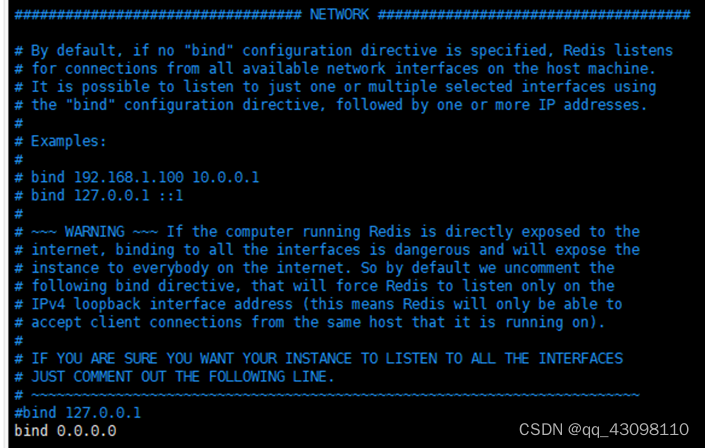
在NETWORK下增加或修改bind 0.0.0.0 #修改ip,此处根据需求进行选择。

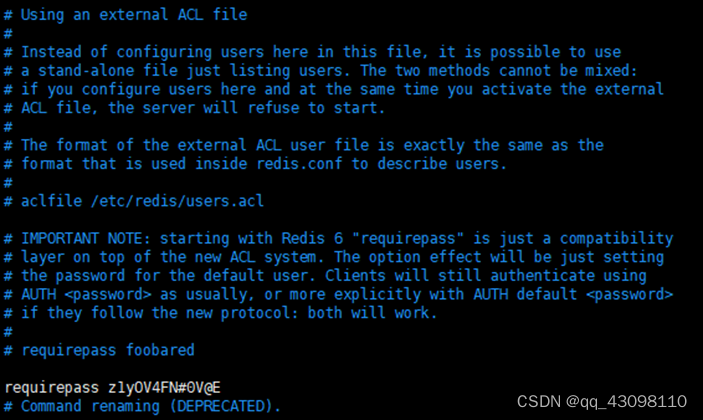
在SECURITY下增加或修改requirepass z1yOV4FN#0V@E #密码修改,此处可根据需求进行修改。

10)	/usr/local/redis/bin/redis-server /usr/local/redis/conf/redis.conf  #启动redis。
11)	cd /usr/local/redis/bin  # 进入目录。
12)	./redis-cli             # 开始测试。
13)	auth z1yOV4FN#0V@E  # 输入配置文件设置的密码
14)	quit                # 退出。

4 mongoDB-4.0.4安装
| 序号 | 名称 |
|---|---|
| 1 | mongodb-linux-x86_64-4.0.4.tgz |
| 2 | mongodb.conf |
1)	上传安装包到任意目录下
2)	mkdir /usr/local/mongoDB  # 创建安装目录。
3)	tar -zxvf mongodb-linux-x86_64-4.0.4.tgz -C /usr/local/mongoDB/ # 将压缩包解压到指定目录下。
4)	cd /usr/local/mongoDB/  # 进入安装目录。
5)	mv mongodb-linux-x86_64-4.0.4/ mongodbsoft/ # 修改目录名称。
6)	mkdir /usr/local/mongoDB/mongodbsoft/data logs etc      # 创建数据库、日志、配置文件夹。
7)	cp mongodb.config /usr/local/mongoDB/mongodbsoft/bin # 上传或复制mongodb.conf配置文件。
8)	./mongod --config /usr/local/mongoDB/mongodbsoft/bin/mongodb.conf   # 启动mongo。
9)	ps -ef |grep mongo      # 查看服务进程。
10)	cd /usr/local/mongoDB/mongodbsoft/bin # 进入bin目录。
11)	./mongo    # 登陆数据库。
12)	>use admin  #进入到admin用户。
13)	>db.createUser( {user: "oneadmin",pwd: "密码",roles: [ { role: "userAdminAnyDatabase", db: "admin" } ]})   # 添加用户。
14)	ctrl+c  # 退出。
15)	./mongo    # 登陆数据库。
16)	> use admin
    switched to db admin
    > db.auth("oneadmin","密码")
    1                                       # 验证新建用户。
17)	>show user

18)	>use alimugo #切换alimugo,创建新库。
19)	>db.createUser({user:"root",pwd:"密码",roles:[{role:"dbOwner",db:"alimugo"}]})    # 创建新用户、库和密码。
20)	ctrl+c  # 退出。
21)	./mongo    # 登陆数据库。
22)	> use alimugo
    switched to db alimugo
    > db.auth("root","密码")
    1
    > show users                    # 验证新建用户。
23)	ctrl+c  # 退出。
5 nginx-1.14.2安装
| 序号 | 名称 |
|---|---|
| 1 | nginx-1.14.2.tar.gz |
| 2 | pcre-zlib-openssl.zip |
| 3 | nginx.conf |
5.2 安装方式
1)	上传1、2安装包到任意目录下。
2)	unzip pcre-zlib-openssl.zip                 #  解压nginx依赖环境包。
3)	cd pcre-zlib-openssl/                      #   进入依赖环境安装包。
4)	dpkg -i *.deb                             #  安装所有的依赖环境。
5)	tar -zxvf nginx-1.14.2.tar.gz -C /usr/loacl/    # 解压nginx安装包到指定文件夹
6)	cd /usr/local/nginx-1.14.2                  #  进入解压好的文件夹
7)	./configure
--prefix=/usr/local/nginx
--sbin-path=/usr/local/nginx/sbin/nginx
--conf-path=/usr/local/nginx /conf/nginx.conf    # 执行安装
8)	make && make install            # 编译。
9)	. /usr/local/nginx/sbin/nginx -t    # 验证安装程序。

12)	上传nginx.conf文件到/usr/local/nginx/conf目录下。
13)	cd /usr/local/nginx/sbin
14)	./nginx                     # 启动
15)	ps -ef | grep nginx           # 查看是否正常启动。
16)	/usr/local/nginx/sbin/nginx -s reload  # 重启
6 Mysql-8.0.32 安装
6.1 安装包列表
| 序号 | 名称 |
|---|---|
| 1 | mysql-server_8.0.32-1ubuntu22.04_amd64.deb-bundle.tar |
| 2 | libaio1_0.3.110-5_amd64.deb |
| 3 | libmecab2_0.996-5_amd64.deb |
6.2 安装方式
将部署包上传至任意目录
部署顺序
| 序号 | 名称 |
|---|---|
| 1 | libaio1_0.3.110-5_amd64.deb |
| 2 | libmecab2_0.996-5_amd64.deb |
| 3 | mysql-community-client-plugins_8.0.32-1ubuntu22.04_amd64.deb |
| 4 | mysql-community-client-core_8.0.32-1ubuntu22.04_amd64.deb |
| 5 | mysql-common_8.0.32-1ubuntu22.04_amd64.deb |
| 6 | mysql-community-client_8.0.32-1ubuntu22.04_amd64.deb |
| 7 | libmysqlclient21_8.0.32-1ubuntu22.04_amd64.deb |
| 8 | libmysqlclient-dev_8.0.32-1ubuntu22.04_amd64.deb |
| 9 | mysql-client_8.0.32-1ubuntu22.04_amd64.deb |
| 10 | mysql-community-server-core_8.0.32-1ubuntu22.04_amd64.deb |
| 11 | mysql-community-server_8.0.32-1ubuntu22.04_amd64.deb |
| 12 | mysql-server_8.0.32-1ubuntu22.04_amd64.deb |
按照上表的顺序进行执行下列语句进行部署
1)	dpkg -i libaio1_0.3.110-5_amd64.deb
2)	dpkg -i libmecab2_0.996-5_amd64.deb
3)	dpkg -i mysql-community-client-plugins_8.0.32-1ubuntu22.04_amd64.deb
4)	dpkg -i mysql-community-client-core_8.0.32-1ubuntu22.04_amd64.deb
5)	dpkg -i mysql-common_8.0.32-1ubuntu22.04_amd64.deb
6)	dpkg -i mysql-community-client_8.0.32-1ubuntu22.04_amd64.deb
7)	dpkg -i libmysqlclient21_8.0.32-1ubuntu22.04_amd64.deb
8)	dpkg -i libmysqlclient-dev_8.0.32-1ubuntu22.04_amd64.deb
9)	dpkg -i mysql-client_8.0.32-1ubuntu22.04_amd64.deb
10)	dpkg -i mysql-community-server-core_8.0.32-1ubuntu22.04_amd64.deb
11)	dpkg -i mysql-community-server_8.0.32-1ubuntu22.04_amd64.deb
12)	dpkg -i mysql-server_8.0.32-1ubuntu22.04_amd64.deb
修改配置文件
1)	cd /etc/mysql/mysql.conf.d/
2)	vim mysqld.cnf
lower_case_table_names = 1    #不区分大小写
skip-grant-tables            #不验证密码
default-storage-engine = InnoDB
innodb_file_per_table = 1
max_connections = 1000
max_connect_errors = 6000
open_files_limit = 65535
table_open_cache = 128
max_allowed_packet = 4M
binlog_cache_size = 1M
max_heap_table_size = 8M
tmp_table_size = 16M
read_buffer_size = 2M
read_rnd_buffer_size = 8M
sort_buffer_size = 8M
join_buffer_size = 8M
thread_cache_size = 8
key_buffer_size = 4M
ft_min_word_len = 4
skip-external-locking
innodb_open_files = 500
innodb_buffer_pool_size = 64M
innodb_write_io_threads = 4
innodb_read_io_threads = 4
innodb_thread_concurrency = 0
innodb_purge_threads = 1
innodb_log_buffer_size = 2M
innodb_log_file_size = 32M
innodb_log_files_in_group = 3
innodb_max_dirty_pages_pct = 90
innodb_lock_wait_timeout = 120
bulk_insert_buffer_size = 8M
interactive_timeout = 28800
wait_timeout = 28800
初始化数据库
1)	systemctl stop mysql
2)	rm -rf /var/lib/mysql/
3)	mkdir /var/lib/mysql
4)	chown mysql:mysql /var/lib/mysql
5)	mysqld --initialize --user=mysql
6)	systemctl start mysql
修改数据库密码
1)	mysql -uroot -p
2)	不用输入密码直接登录
3)	mysql>ALTER USER 'root'@'localhost' IDENTIFIED WITH mysql_native_password BY '我的密码';    # 会报错,不用管直接执行下面语句。
4)	mysql> flush privileges;
5)	mysql>ALTER USER 'root'@'localhost' IDENTIFIED WITH mysql_native_password BY '我的密码';
6)	mysql>quit
恢复密码验证
1)	cd /etc/mysql/mysql.conf.d/
2)	vim mysqld.cnf
3)	删除或注释掉skip-grant-tables这句,再重启MySQL:systemctl restart mysql 。
导入数据库
1)	mysql -uroot -p
2)	mysql>create database 数据库名;
3)	mysql>use 数据库名;
4)	mysql>source /绝对路径/ xxx.sql;
开通远程访问
1)	mysql -uroot -p
2)	use mysql
3)	修改用户设置
4)	update user set host='%' where user='root';
5)	使修改生效
6)	flush privileges;
7)	设置远程密码
8)	ALTER USER 'root'@'%' IDENTIFIED BY '我的密码' PASSWORD EXPIRE NEVER;
9)	设置远程权限
10)	ALTER USER 'root'@'%' IDENTIFIED WITH mysql_native_password BY '我的密码';
11)	使修改生效
12)	flush privileges;
7 ffmpeg
7.1 安装包列表
| 序号 | 名称 |
|---|---|
| 1 | ffmpeg-git-amd64-static.tar.xz |
7.2 安装方式
1)	mkdir -p /usr/local/ffmpeg
2)	xz -d ffmpeg-git-amd64-static.tar.xz
3)	tar -xvf ffmpeg-git-amd64-static.tar.xz -C /usr/local/ffmpeg
4)	cd /usr/local/ffmpeg/ffmpeg-git-20200803-amd64-static
5)	./ffmpeg
6)	cd /usr/bin
7)	ln -s /usr/local/ffmpeg/ffmpeg-git-20200803-amd64-static/ffmpeg ffmpeg
ln -s /usr/local/ffmpeg/ffmpeg-git-20200803-amd64-static/ffprobe ffprobe
8)	随意进入目录输入
ffmpeg -i a.mp4

相关组件下载链接:链接:https://pan.baidu.com/s/1H1wsqueN32Dc_0cW5htaNA
提取码:e1sk
原创!仅供参考!点赞关注!谢谢支持!


