本文基于viper实现了apollo多实例快速接入,授人以渔,带着大家读源码,详解实现思路,封装成自己的工具类并且开源。
前言
viper是适用于go应用程序的配置解决方案,这款配置管理神器,支持多种类型、开箱即用、极易上手。
本地配置文件的接入能很快速的完成,那么对于远程apollo配置中心的接入,是否也能很快速完成呢?如果有多个apollo实例都需要接入,是否能支持呢?以及apollo远程配置变更后,是否能支持热加载,实时更新呢?
拥抱开源
带着上面的这些问题,结合实际商业项目的实践,已经有较成熟的解决方案。本着分享的原则,现已将xconfig包脱敏开源:github地址,欢迎体验和star。
下面快速介绍下xconfig包的使用与能力,然后针对包的封装实践做个讲解
获取安装
go get -u github.com/jinzaigo/xconfig
Features
- 支持viper包诸多同名方法
- 支持本地配置文件和远程apollo配置热加载,实时更新
- 使用sync.RWMutex读写锁,解决了viper并发读写不安全问题
- 支持apollo配置中心多实例配置化快速接入
接入示例
本地配置文件
指定配置文件路径完成初始化,即可通过xconfig.GetLocalIns().xxx()链式操作,读取配置
package main

import (
    "fmt"
    "github.com/jinzaigo/xconfig"
)

func main() {
    if xconfig.IsLocalLoaded() {
        fmt.Println("local config is loaded")
        return
    }
    //初始化
    configIns := xconfig.New(xconfig.WithFile("example/config.yml"))
    xconfig.InitLocalIns(configIns)

    //读取配置
    fmt.Println(xconfig.GetLocalIns().GetString("appId"))
    fmt.Println(xconfig.GetLocalIns().GetString("env"))
    fmt.Println(xconfig.GetLocalIns().GetString("apollo.one.endpoint"))
}
xxx支持的操作方法:
- IsSet(key string) bool
- Get(key string) interface{}
- AllSettings() map[string]interface{}
- GetStringMap(key string) map[string]interface{}
- GetStringMapString(key string) map[string]string
- GetStringSlice(key string) []string
- GetIntSlice(key string) []int
- GetString(key string) string
- GetInt(key string) int
- GetInt32(key string) int32
- GetInt64(key string) int64
- GetUint(key string) uint
- GetUint32(key string) uint32
- GetUint64(key string) uint64
- GetFloat(key string) float64
- GetFloat64(key string) float64
- GetFloat32(key string) float32
- GetBool(key string) bool
- SubAndUnmarshal(key string, i interface{}) error
远程apollo配置中心
指定配置类型与apollo信息完成初始化,即可通过xconfig.GetRemoteIns(key).xxx()链式操作,读取配置
单实例场景
//初始化
configIns := xconfig.New(xconfig.WithConfigType("properties"))
err := configIns.AddApolloRemoteConfig(endpoint, appId, namespace, backupFile)
if err != nil {
    ...handler
}
xconfig.AddRemoteIns("ApplicationConfig", configIns)

//读取配置
fmt.Println(xconfig.GetRemoteIns("ApplicationConfig").AllSettings())
多实例场景
在本地配置文件config.yaml维护apollo配置信息,然后批量完成多个实例的初始化,即可通过xconfig.GetRemoteIns(key).xxx()链式操作,读取配置
#apollo配置,支持多实例多namespace
apollo:
  one:
    endpoint: xxx
    appId: xxx
    namespaces:
      one:
        key: ApplicationConfig   #用于读取配置,保证全局唯一,避免相互覆盖
        name: application        #注意:name不要带类型(例如application.properties),这里name和type分开配置
        type: properties
      two:
        key: cipherConfig
        name: cipher
        type: properties
    backupFile: /tmp/xconfig/apollo_bak/test.agollo #每个appId使用不同的备份文件名,避免相互覆盖
package main

import (
    "fmt"
    "github.com/jinzaigo/xconfig"
)

type ApolloConfig struct {
    Endpoint   string                     `json:"endpoint"`
    AppId      string                     `json:"appId"`
    Namespaces map[string]ApolloNameSpace `json:"namespaces"`
    BackupFile string                     `json:"backupFile"`
}

type ApolloNameSpace struct {
    Key  string `json:"key"`
    Name string `json:"name"`
    Type string `json:"type"`
}

func main() {
    //本地配置初始化
    xconfig.InitLocalIns(xconfig.New(xconfig.WithFile("example/config.yml")))
    if !xconfig.GetLocalIns().IsSet("apollo") {
        fmt.Println("without apollo key")
        return
    }

    apolloConfigs := make(map[string]ApolloConfig, 0)
    err := xconfig.GetLocalIns().SubAndUnmarshal("apollo", &apolloConfigs)
    if err != nil {
        fmt.Println(apolloConfigs)
        fmt.Println("SubAndUnmarshal error:", err.Error())
        return
    }

    //多实例初始化
    for _, apolloConfig := range apolloConfigs {
        for _, namespaceConf := range apolloConfig.Namespaces {
            configIns := xconfig.New(xconfig.WithConfigType(namespaceConf.Type))
            err = configIns.AddApolloRemoteConfig(apolloConfig.Endpoint, apolloConfig.AppId, namespaceConf.Name, apolloConfig.BackupFile)
            if err != nil {
                fmt.Println("AddApolloRemoteConfig error:" + err.Error())
            }
            xconfig.AddRemoteIns(namespaceConf.Key, configIns)
        }
    }

    //读取
    fmt.Println(xconfig.GetRemoteIns("ApplicationConfig").AllSettings())
}
封装实践
欢迎大家关注我们,拥抱开源:加入我和劲仔的交流群
学会使用xconfig包后,能快速的实现本地配置文件和远程apollo配置中心多实例的接入。再进一步了解这个包在封装过程都中遇到过哪些问题,以及对应的解决方案,能更深入的理解与使用这个包,同时也有助于增加读者自己在封装新包时的实践理论基础。
1.viper远程连接不支持apollo
查看viper的使用文档,会发现viper是支持远程K/V存储连接的,所以一开始我尝试着连接apollo
v := viper.New()
v.SetConfigType("properties")
err := v.AddRemoteProvider("apollo", "http://endpoint", "application")
if err != nil {
    panic(fmt.Errorf("AddRemoteProvider error: %s", err))
}
fmt.Println("AddRemoteProvider success")
//执行结果:
//panic: AddRemoteProvider error: Unsupported Remote Provider Type "apollo"
执行后发现,并不支持apollo,随即查看viper源码,发现只支持以下3个provider
// SupportedRemoteProviders are universally supported remote providers.
var SupportedRemoteProviders = []string{"etcd", "consul", "firestore"}
解决方案:
安装shima-park/agollo包: go get -u github.com/shima-park/agollo
安装成功后,只需要在上面代码基础上,最前面加上 remote.SetAppID("appId") 即可连接成功
import (
  "fmt"
  remote "github.com/shima-park/agollo/viper-remote"
  "github.com/spf13/viper"
)

remote.SetAppID("appId")
v := viper.New()
v.SetConfigType("properties")
err := v.AddRemoteProvider("apollo", "http://endpoint", "application")
if err != nil {
    panic(fmt.Errorf("AddRemoteProvider error: %s", err))
}
fmt.Println("AddRemoteProvider success")
//执行结果:
//AddRemoteProvider success
2.agollo是怎么让viper支持apollo连接的呢
不难发现,在执行 remote.SetAppID("appId") 之前,remote.go 中init方法,会往viper.SupportedRemoteProviders中append一个”apollo”,其实就是让viper认识一下这个provider,随后将viper.RemoteConfig 做重新赋值,并重新实现了viper中的Get Watch WatchChannel这3个方法,里边就会做apollo连接的适配。
//github.com/shima-park/agollo/viper-remote/remote.go 278-284行
func init() {
  viper.SupportedRemoteProviders = append(
    viper.SupportedRemoteProviders,
    "apollo",
  )
  viper.RemoteConfig = &configProvider{}
}

//github.com/spf13/viper/viper.go 113-120行
type remoteConfigFactory interface {
  Get(rp RemoteProvider) (io.Reader, error)
  Watch(rp RemoteProvider) (io.Reader, error)
  WatchChannel(rp RemoteProvider) (
3.agollo只支持apollo单实例,怎么扩展为多实例呢
执行remote.SetAppID("appId")之后,这个appId是往全局变量appID里写入的,并且在初始化时也是读取的这个全局变量。带来的问题就是不支持apollo多实例,那么解决呢
//github.com/shima-park/agollo/viper-remote/remote.go 26行
var (
  // apollod的appid
  appID string
  ...
)
func SetAppID(appid string) {
  appID = appid
}

//github.com/shima-park/agollo/viper-remote/remote.go 252行
switch rp.Provider() {
...
case "apollo":
    return newApolloConfigManager(appID, rp.Endpoint(), defaultAgolloOptions)
}
解决方案:
既然agollo包能让viper支持apollo连接,那么为什么我们自己的包不能让viper也支持apollo连接呢?并且我们还可以定制化的扩展成多实例连接。实现步骤如下:
- shima-pack/agollo/viper-remote/remote.go复制一份出来,把全局变量appID删掉
- 定义
"providers sync.Map",实现AddProviders()方法,将多个appId往里边写入,里边带上agollo.Option相关配置;同时关键操作要将新的provider往viper.SupportedRemoteProviders append,让viper认识这个新类型 - 使用的地方,根据写入时用的provider 串,去读取,这样多个appId和Option就都区分开了
- 其他代码有标红的地方就相应改改就行了
核心代码 查看GitHub即可:
//github.com/jinzaigo/xconfig/remote/remote.go
var (
  ...
  providers sync.Map
)

func init() {
  viper.RemoteConfig = &configProvider{} //目的:重写viper.RemoteConfig的相关方法
}

type conf struct {
  appId string
  opts  []agollo.Option
}

//【重要】这里是实现支持多个appId的核心操作
func AddProviders(appId string, opts ...agollo.Option) string {
    provider := "apollo:" + appId
    _, loaded := providers.LoadOrStore(provider, conf{
        appId: appId,
        opts:  opts,
    })

    //之前未存储过,则向viper新增一个provider,让viper认识这个新提供器
    if !loaded {
        viper.SupportedRemoteProviders = append(
            viper.SupportedRemoteProviders,
            provider,
        )
    }

    return provider
}

//使用的地方
func newApolloConfigManager(rp viper.RemoteProvider) (*apolloConfigManager, error) {
  //读取provider相关配置
  providerConf, ok := providers.Load(rp.Provider())
  if !ok {
    return nil, ErrUnsupportedProvider
  }

  p := providerConf.(conf)
  if p.appId == "" {
    return nil, errors.New("The appid is not set")
  }
  ...
}
4.viper开启热加载后会有并发读写不安全问题
首先 viper的使用文档,也说明了这个并发读写不安全问题,建议使用sync包避免panic

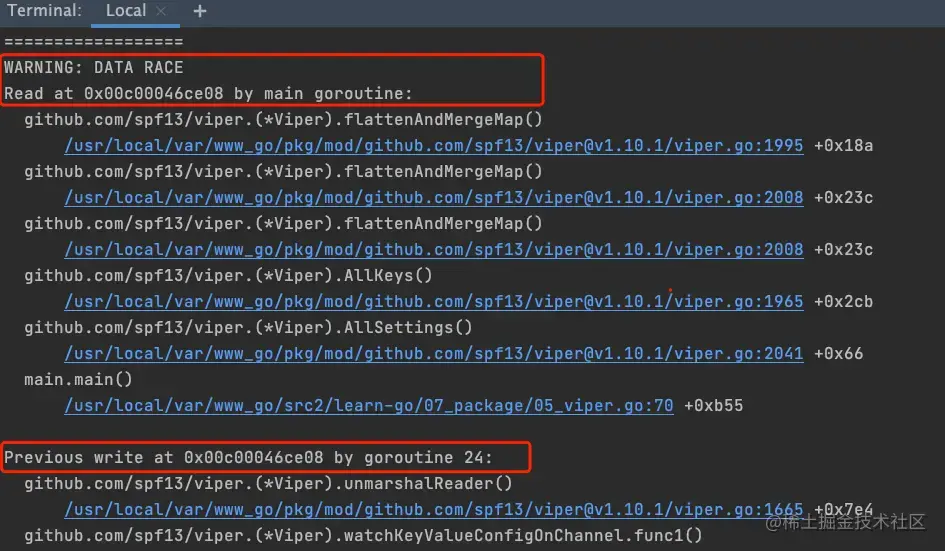
然后本地通过-race试验,也发现会有这个竞态问题

进一步分析viper实现热加载的源代码:其实是通过协程实时更新kvstrore这个map,读取数据的时候也是从kvstore读取,并没有加锁,所以会有并发读写不安全问题
// 在github.com/spf13/viper/viper.go 1909行
// Retrieve the first found remote configuration.
func (v *Viper) watchKeyValueConfigOnChannel() error {
  if len(v.remoteProviders) == 0 {
    return RemoteConfigError("No Remote Providers")
  }

  for _, rp := range v.remoteProviders {
    respc, _ := RemoteConfig.WatchChannel(rp)
    // Todo: Add quit channel
    go func(rc
解决方案:
写:不使用viper自带热加载方法,而是采用重写,也是使用协程实时更新,但会加读写锁。
读:也加读写锁
读写锁核心代码GitHub:
//github.com/jinzaigo/xconfig/config.go
type Config struct {
    configType string
    viper      *viper.Viper
    viperLock  sync.RWMutex
}

//写
//_ = c.viper.WatchRemoteConfigOnChannel()
respc, _ := viper.RemoteConfig.WatchChannel(remote.NewProviderSt(provider, endpoint, namespace, ""))
go func(rc
5.如何正确的输入namespace参数
问题描述:
调用agollo包中的相关方法,输入namespace=application.properties(带类型),发现主动拉取数据成功,远程变更通知后数据拉取失败;输入namespace=application(不带类型),发现主动拉取数据成功,远程变更通知后数据拉取也能成功。两者输入差异就在于是否带类型
问题原因:
查看Apollo官方接口文档,配置更新推送接口notifications/v2 notifications字段说明,一目了然。

基于上述说明,我们在代码里做了兼容处理,并且配置文件也加上了使用说明
//github.com/jinzaigo/xconfig/config.go 72行
func (c *Config) AddApolloRemoteConfig(endpoint, appId, namespace, backupFile string) error {
    ...
    //namespace默认类型不用加后缀,非默认类型需要加后缀(备注:这里会涉及到apollo变更通知后的热加载操作 Start->longPoll)
    if c.configType != "properties" {
        namespace = namespace + "." + c.configType
    }
    ...
}

//config.yml配置说明
namespaces:
    one:
        key: ApplicationConfig   #用于读取配置,保证全局唯一,避免相互覆盖
        name: application        #注意:name不要带类型(例如application.properties),这里name和type分开配置
        type: properties
总结
基于实际商业项目实践,提升配置管理组件能力,实现了本地配置文件与远程apollo配置中心多实例快速接入;
从xconfig包的快速上手的使用说明到封装实践难点痛点的解析,双管齐下,让你更深入的理解,希望对你有所帮助与收获。
开源项目xconfig,github地址。欢迎体验与star。
一起学习
欢迎在CSDN私信我,也欢迎 加我好友 一起学习。


